Muscle Research
So back at it again… I have been researching Maya and Max’s ability to successfully simulate muscle level of detail with animation. Today we discuss Max’s tools.
Angle Deformers:
Used to fix problem areas or enhance deformation by morphing when two bones corresponding angle’s change. Apply this deformer within the Skin modifier and you can morph selected vertices with a simple lattice when the corresponding angles of two bones change value (See Fig 1). This is simple solution to give simplistic muscle deformations. But it is very rigid and does not offer jiggle, response to gravity, or reaction from speed changes in joints.
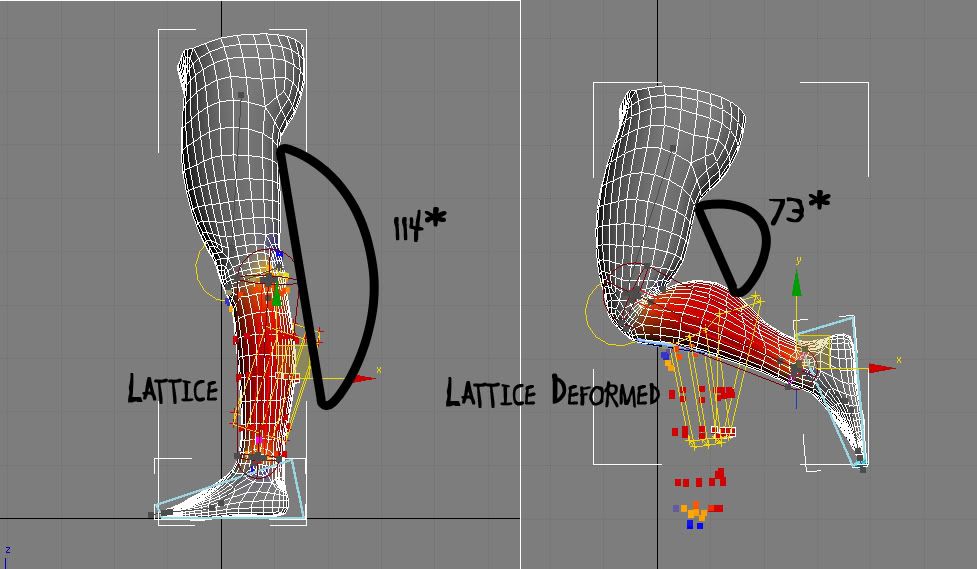
This Method of using bone angles to morph specific vertices could be very advantageous to cartoony and stylistic characters but can’t be relied on to offer simulations involving gravity, and “jiggle.” In humans, muscle and fat play key roles by sliding and bulging beneath the skin. The Joint Angle Deformer does not offer the ability to slide both beneath the skin and on top of bone like human muscle mass does. (Fig. 2)
To achieve an illusion of this “Sliding” the closest technique available in max to simulate mass reacting to gravity would be the FLEX modifier which controls vertex reactions based on gravity and speed of the vertices affected through the main skin’s animation. One could, in theory, apply an Angle deformer and Flex Modifier to specific vertices that were desired to move like muscle and fat, but this would be an illusion as there would be no actual mass that can be edited visually or react with bones beneath the characters geometric skin. Furthermore, the FLEX modifier offers no way of BAKING information into external files to save memory during viewport playback. The Flex Modifier only works with selected vertices and even better when the vertices are soft selected that way the bounces are applied heavier to some vertices and soften out towards the edges of the selection. To do this one needs to ADD a Edit Poly modifier on top of the Skin modifier that way you can select vertices after they are animated with bones.
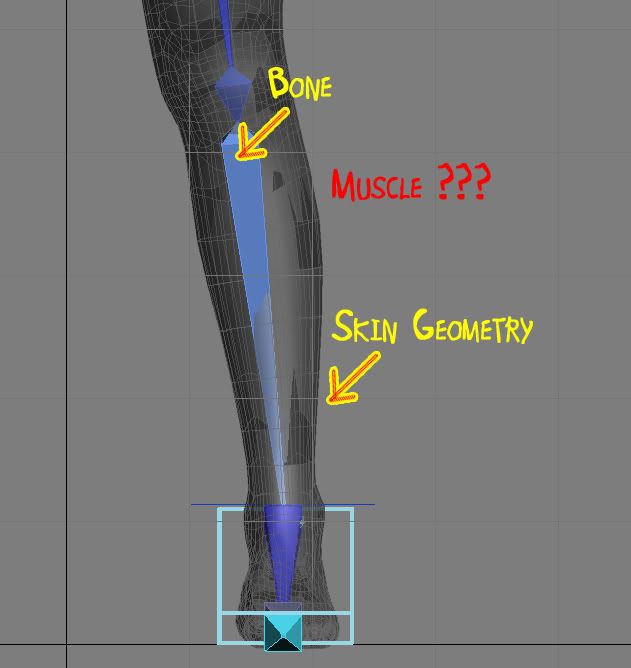
To achieve accurate and easily editable muscle simulations one needs to be able to manipulate 3 types of objects. (1) Bones for animation and rough vertex control of skin. (2) Muscles in the Form of NURBS based geometry to slide on top of bone objects, react to gravity and movement, and to control skin geometry. (3) Skin geometry to both look like human skin and deform to bone and muscle simulations accurately. As of yet 3ds Max can not accurately simulate the interactions between these 3 types of objects nor do they offer comprehensible tools to do so.
Here are some other awesome links I have found that other people are discussing!
http://forums.cgsociety.org/showthread.php?t=304707
I am in contact with this university and they have an awesome face solution based on a huge library of facial animation… But no Muscle implementation….
The Institute of Animation a division of the Filmakademie Baden-Wuerttemburg in Germany is currently working on a project deemed “Dynamic Real-Time Animation” (2006-2010). They have developed a toolset that is available to download for Maya called the Facial Animation Toolset 1.2. The team accepts outside college research in the form of collaborative projects. Their input may be of use. Their tool implements the:
“Adaptable Facial Setup which is capable of driving any humanoid geometry, drawing from an extensive, FACS-based library of facial movement components. The process of fitting the head skeleton to the individual geometry is simplified by offering a standard set of skin weights that accommodates the typical deformation regions of the face. Any skin weights may be cloned topology-independent from one head to another utilizing the Geometry Matching Tool. The Corrective Blendshape Manager offers a useful way to add subtle deformations to a skinned mesh. Blendshape targets can be created and edited, and are computed with respect to the bind pose of the skinned mesh.”
The weakness (and strengths) of their toolset is that the motion is derived independently from a Library of Motion Capture files that are stratified and grouped by the F.A.C.S. which was developed in the late seventies by Friedman whom classified the entire movement capability of the face by muscle. Their goal is to use Motion Capture animation to classify movements based on the F.A.C.S. system first and then mix together each F.A.C.S. animation to achieve a believable face. A rather good ideal but it doesn’t use muscle technologies to achieve gravity and inertia simulation during CG character movements.
Therefore it is still crucial to see if a fully anatomically correct muscle rigged system can be implemented and achieved.
Maya will be next, I can already guarantee I will be using their muscle tools based on Mike Comet’s work!!!!
Tags: Face Muscles in CG, Zeb Wood


